The Empowered Gal’s Guide to Hanging Christmas Lights (the easy way!)

The Empowered Gal’s Guide to Hanging Christmas Lights (the easy way!)

The Empowered Gal’s Guide to Hanging Christmas Lights

(the easy way!)

It’s finally that time of year! The air is frosty, stores are filled with holiday goodies, & all your neighbors have their Christmas lights up.

Whether you live in a house, dorm, or apartment I have the E A S I E S T light hanging hack to get you festive in no time!

I’m a Target gal myself, so I picked up some lights from my local Target. Good news–they happen to be on sale right now!

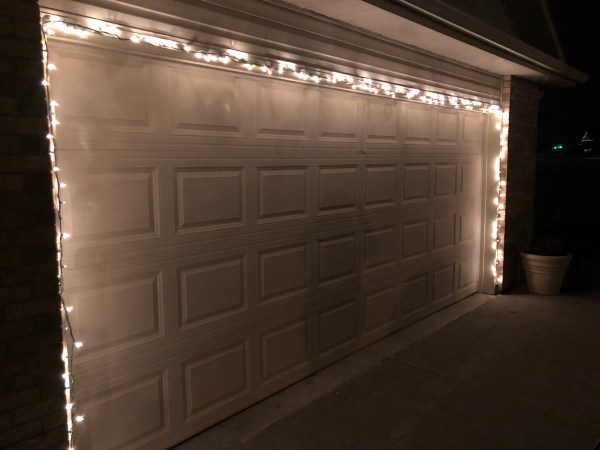
I picked up Wondershop Twinkling Clear Net Lights for $9 for our bush out front & several strands of Wondershop LED Mini Lights for $9 each. I only wanted to put lights around our front door & garage door for simplicity’s sake of taking them down later (lazy or genius?!).

Next was finding something durable & simple to keep the lights up. For years I watched my dad attach lights to our roof with those little plastic clips & I decided I wanted no part of that (ladders, no thank you)! I went to the Command hook aisle hoping to find something easy to use & they actually make light clips specifically made for outdoor use. WHO KNEW?! The Command Clear Outdoor Light Clips are only $9.99 for 36 (the clips are reusable–just buy new sticky strips).

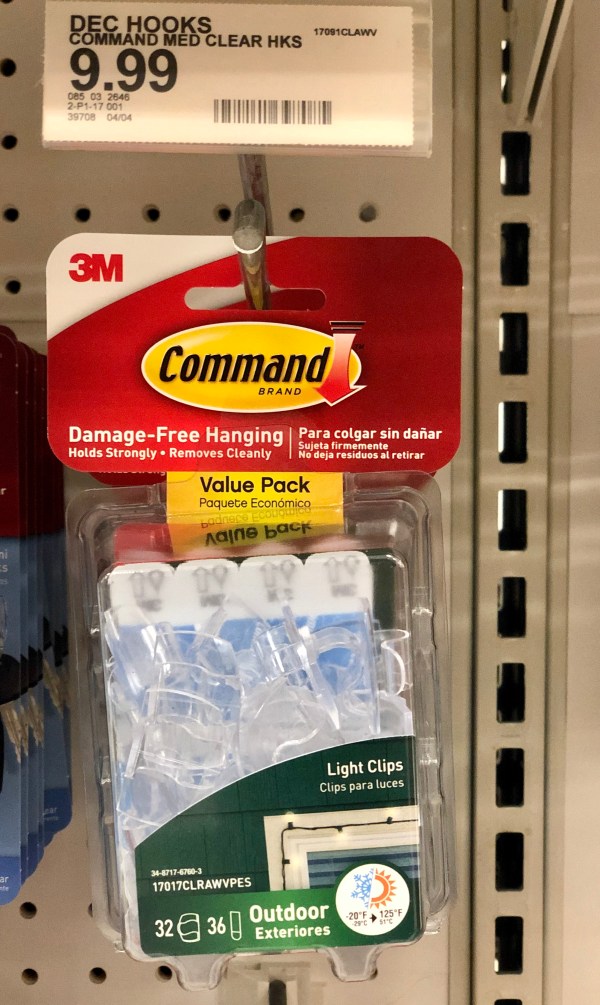
These hooks are literally the easiest thing I’ve ever used! They come with sticky tabs to put on the back of the light clips. You peel & stick it onto the clip, then stick the clip to the door frame (or wherever you’re putting it). The package says to clean the surface before sticking the clips to it, but I didn’t have the time for that–I hung them up anyway & a couple wind storms later they’re still standing strong!

It took me less than an hour from start to finish to hang up lights around the front door, garage door & the bush. Who needs to wait around for someone else to put Christmas lights up for them? Girl, get EMPOWERED and hang those lights yourself!

Happy decorating! XO, Han

Silver Pieces: Reviving a Lost Art

Silver Pieces: Reviving a Lost Art

I wouldn’t consider myself to be your typical 23 year old–I enjoy collecting silver pieces, antiquing on the weekends & rearranging my china cabinet. You may think that sounds a little old-fashioned, but I’m just that–old fashioned.

This year I became very interested in collecting antique & vintage silver pieces to add a little interest around my home. I had no idea where to begin when it came to determining the quality or value of pieces I saw around antique stores & estate sales, but after reading countless articles online & enlisting the help of my mother-in-law I finally have a grasp on finding the perfect pieces for the right price, & how to bring them back to life when they’ve been neglected for years.

That being said, sometimes you find the most gorgeous silver tray, coffee serving set or vase & it seems like it could never be revived from the tarnish that has taken over. With the right cleaning tools, a whole lot of time & more elbow grease than you could dream of using, these beautiful antiques will shine!

These pieces were horribly tarnished when I found them.
After hours of scrubbing, this gorgeous coffee & tea set came back to life.

Forget the messy silver polish–the best tool ever for making your silver shine like new again (besides some good ol’ fashioned elbow grease) are the Connoisseurs Silver Wipes. You can pick them up at Bed, Bath & Beyond for $6.99.

This brilliant invention is SO easy to use! First, get your silver piece wet, then rub the tarnish off with one of these wipes. The wipe will look super dirty (so will your hands, so girl take those rings off!), but it’ll still get that stubborn tarnish off when the wipe is black. When you’re satisfied with the amount of tarnish you’ve taken off, run the silver piece under water and gently wash it off with Dawn dish shop. Dry with a microfiber cloth and make sure it’s completely dry before closing any lids–if you don’t make sure it’s dry you’ll get some nasty staining on the inside of your piece. It is highly advised to N O T let your silver air dry!

If you have some silver pieces that need brought back to life, I highly recommend trying these silver wipes out. I’d love to see how your piece turn out; drop some photos of your favorite pieces in the comments below!

xo, Han